SSL Certificates are an essential tool to showcase that your website is secure. if a website has an SSL certificate, you’ll see a little padlock icon in your web browser, and the web address starts with “https://” instead of “http://” which means that data, like passwords or credit card numbers, be encrypted and secure when you use that website.
In this guide, you will learn how to Install SSL Certificates for free with AeonFree free web hosting. Aeonfree is a free web hosting service designed and developed to help people establish an online presence for free, we provide free web hosting services to people who need it and also a variety of free tools. SSL is no exception, you will be able to easily generate SSL Certificates and use it on your website for free forever.
The SSL Certificates we currently provide is GoGetSSL but make sure to watch out for more, we will be providing more options in the future ?.
To install a certificate on your website, you will need to complete the below steps. There Is also a link to the video tutorial below!
Step 1. Create a new hosting account.
Creating an account is essential in free hosting to prevent spam, You will need to sign up for a new account and create a new hosting account. You can then choose a free domain name or add your own domain name. If you have not created an account and a hosting account, then it’s really simple. There is already a guide and a video tutorial available here. Do check it out.
What if you want to use the SSL certificate elsewhere for a different domain name, is it possible?
Yes, of course. You do not need to create a Hosting Account for that purpose. But you still need to sign up and create a new Dashboard Account, you can use the Free SSL Generator Tool to generate the certificate for any Domain name, even if they are hosted elsewhere rather than aeonfree for free!
If you are confused, do not worry. Just follow Step 1 from the guide in the above link and come back here.
Step 2. Choose a domain name.
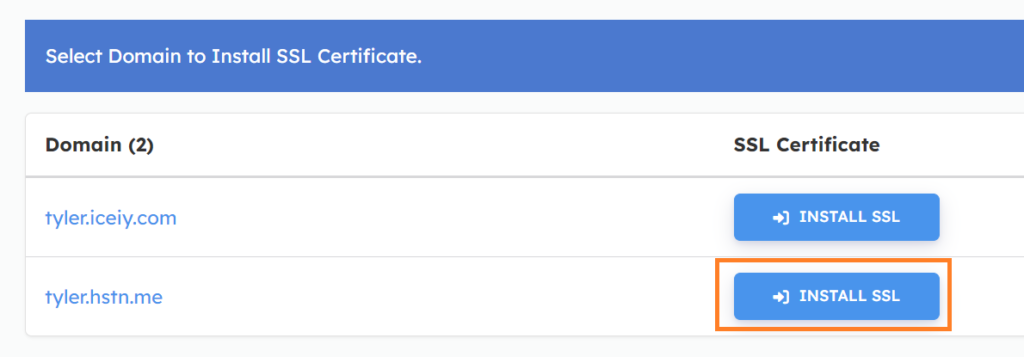
Go to the Free SSL Certificates Tab in the sidebar OR Go to the Information Page of your Hosting account and click on the SSL Certificate Button.
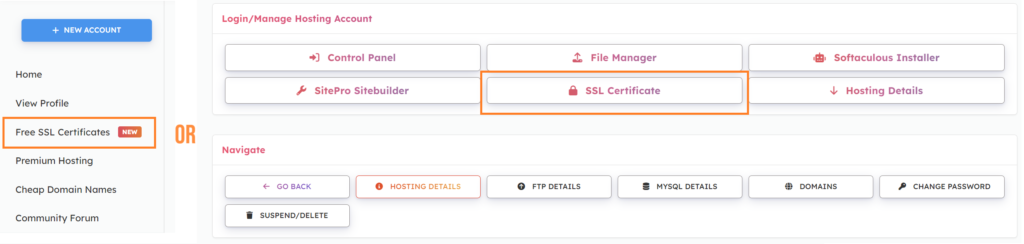
Then choose a domain name to install a free SSL Certificate.
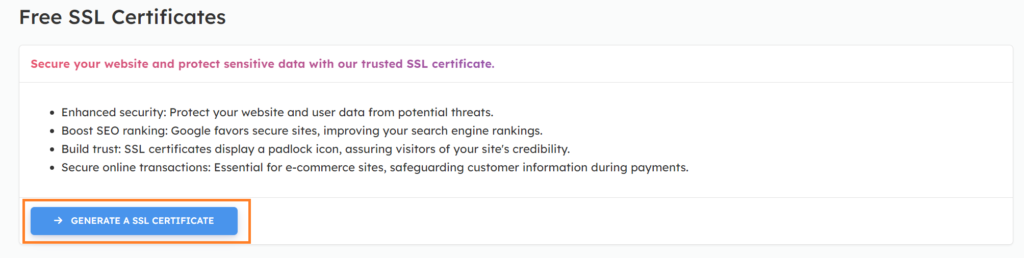
If you are not using our free hosting service, or want to write a domain name manually: Go to the Free SSL Certificates Tab in the sidebar. You can then click on the Generate an SSL Certificate Link.
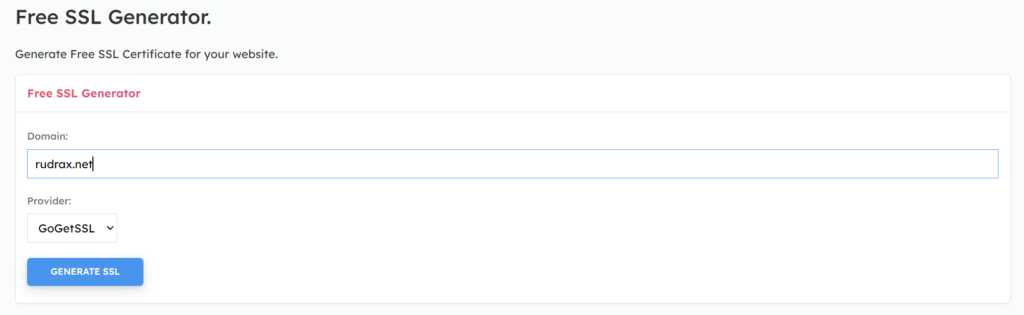
You can then, enter your domain name, choose a provider, and click on “Generate SSL”.
— End of (OR) Section —
Step 3. Verifying DNS Records.
In order to install an SSL certificate, we first need to verify our domain names with the Certificate authority. In our case, We do that by using CName Verifications.
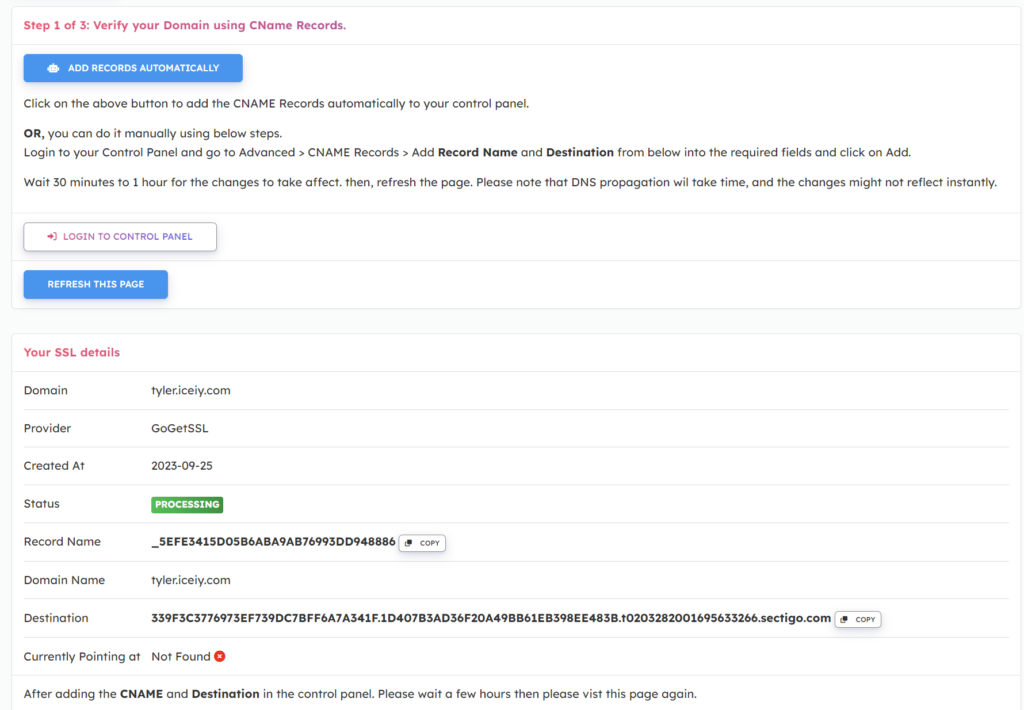
After selecting Install SSL (or Generate SSL) you should be redirected to this page. You now need to Point the DNS records of your domain name to the provided destination.
If you are using our Hosting service you do not need to do any manual steps, You can just click on the “? Add Records Automatically” Option to add the SSL Records Automatically to your Control Panel. If it fails somehow sometime, you can follow the manual steps below.
(OR) Adding The DNS Records Manually.
If the “Add Records Automatically” Button does not work and you see a red error, you can follow this guide.
Click on the Login To Control Panel button if it is available from the page. if the button is not available, go to the Dashboard Screen and log in from there.
Go to Advanced > CName records Section

Copy the Record Name and Destination from the SSL Generator Page in the Aeonfree Dashboard, and Paste it into the mentioned fields inside the Control Panel. Don’t forget to select the correct domain name. You can click on the copy button to copy the data.
Then Click on “Add”
Copy the data from the SSL Generator Dashboard:

Paste it inside the Control Panel’s CNAME Records page:

Then You will need to wait 30 Minutes to 1 Hour (Sometimes it takes longer than that) due to DNS Propagation. Your SSL Certificate Will be generated automatically and you can then follow the below steps.
— End of (OR) Section —
After a Few Hours (Around 1 – 2 hours) the SSL Status changes to Active like in this image, follow Step 4 onwards:

Step 4. Installing the Generated SSL Certificates.
Visit your domain’s SSL Page. If you closed it mistakenly, just go to the Free SSL Generator Page and click on the “Manage SSL” Button on the page.
Click on the “? Install Certificate Automatically” Button to install the certificate automatically if you are using our hosting service. Wait 2-3 minutes then refresh the page and check if the SSL is Installed Successfully.
If something goes wrong and you see a red error message or, you want to do it manually, follow the guide below.
(OR) Installing the SSL Certificate Manually.
If the “Install Certificate Automatically” Button does not work and you see a red error, you can follow this guide.
Click on the Login To Control Panel button if it is available from the page. if the button is not available, go to the Dashboard Screen and log in from there.
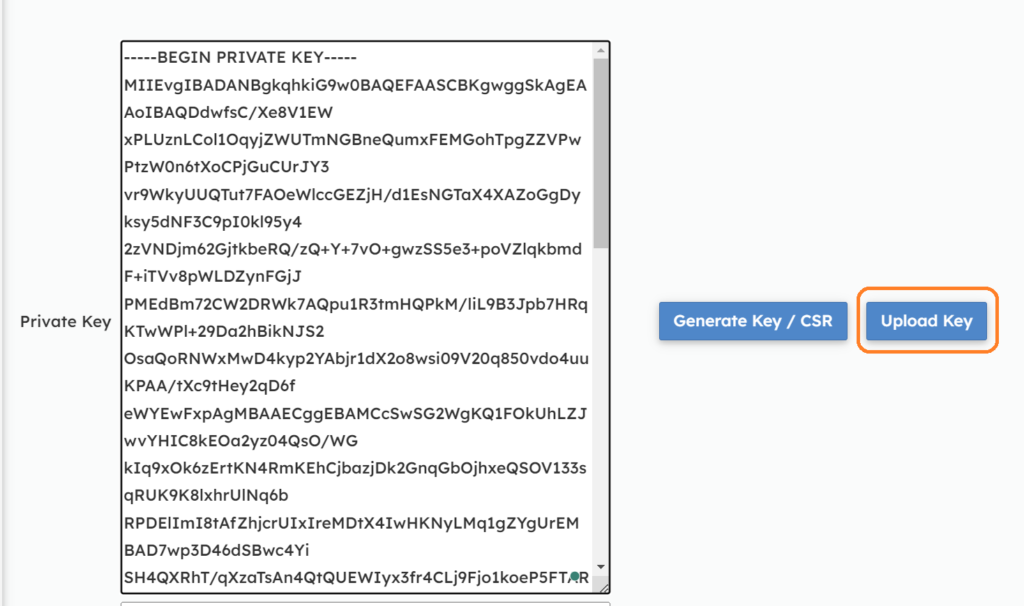
Go to Security > SSL/TLS Section

Then click on the “Configure” button for the domain you like to install the SSL Certificate.

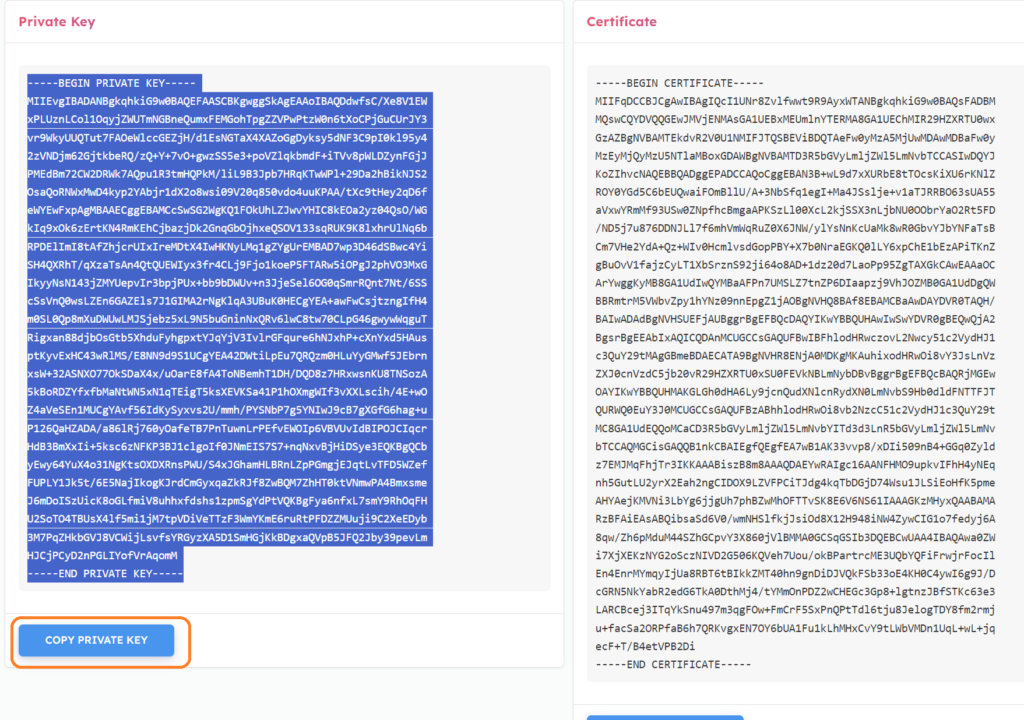
Copy The private key from our Free SSL Generator Dashboard.
then, paste it on the Configure Page, in the Private Key Field. Then click on “Upload Key” button.
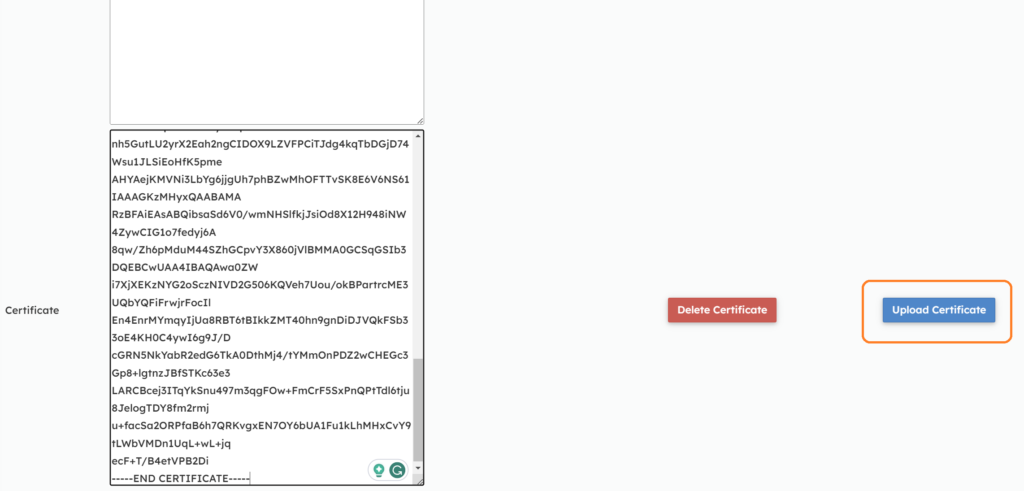
Copy the certificate from the Dashboard Page.
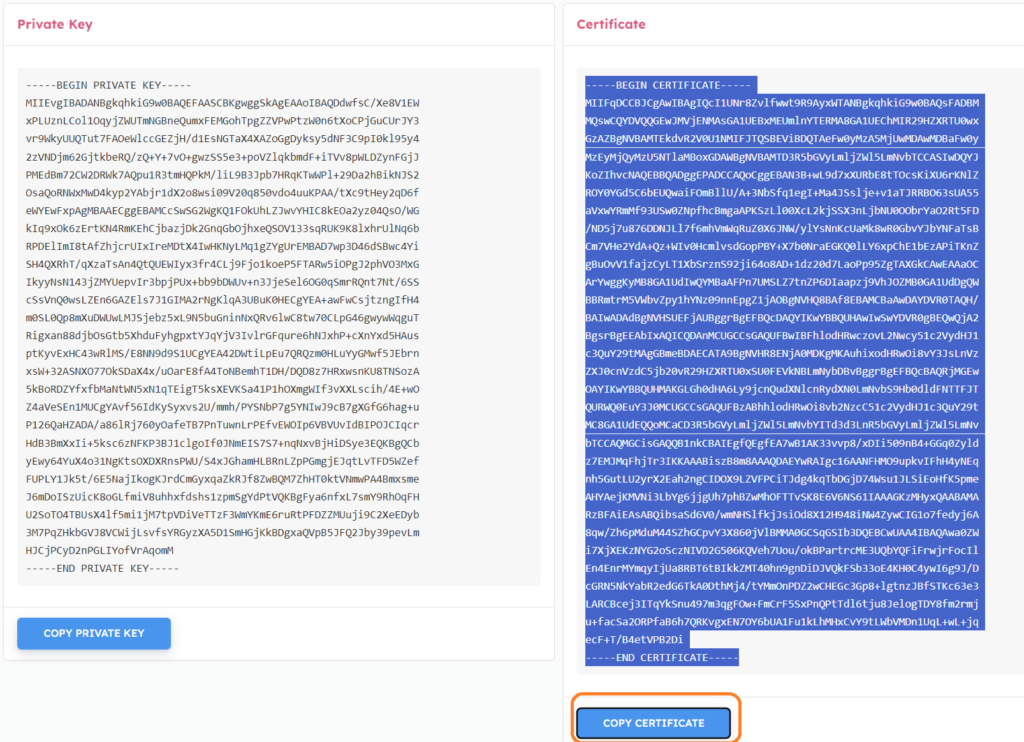
then, paste it on the Configure Page, in the Certificate Field. Then click on the “Upload Certificate” button.
Wait 2-3 minutes, then refresh the SSL Generator Page in the Aeonfree Dashboard.
— End of (OR) Section —
Step 5. Verifying the SSL
The result should be something like this,
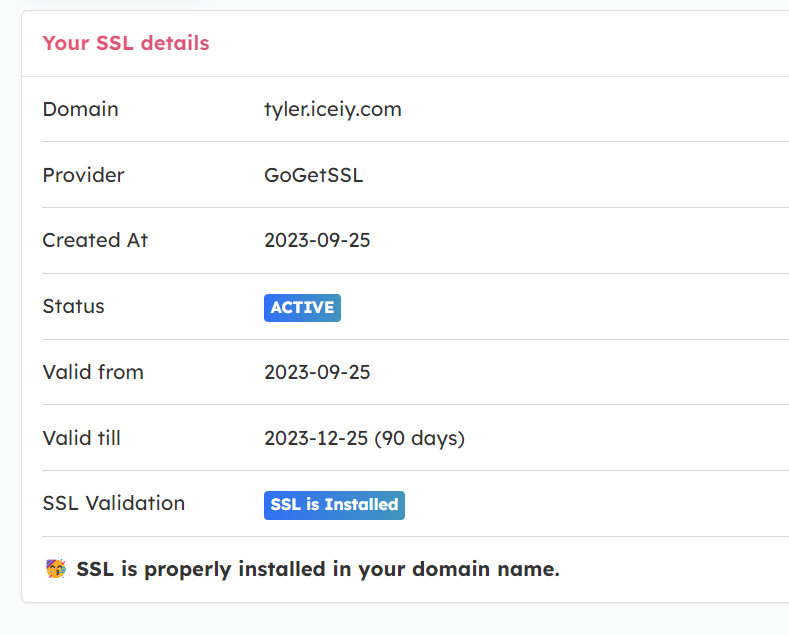
If the result is similar, Go to “Step 4: Check SSL” on the SSL Page and click on your website link.

Click on the link and check if there is a padlock symbol.

Step 5. Redirect http:// links to https://
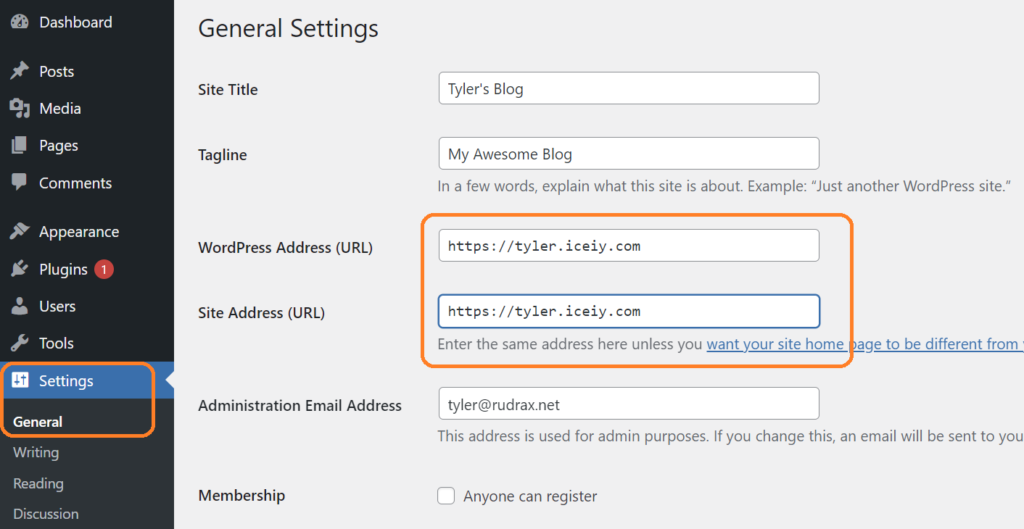
If you are using a CMS software like WordPress, go to Settings -> General and find the fields labeled as WordPress Address (URL) and Site Address (URL). Change the URLs in those fields to start from https.
If you are using a custom PHP script and just want a fast and dirty way to redirect the website to https. Follow Step 3 on the SSL Install Page.
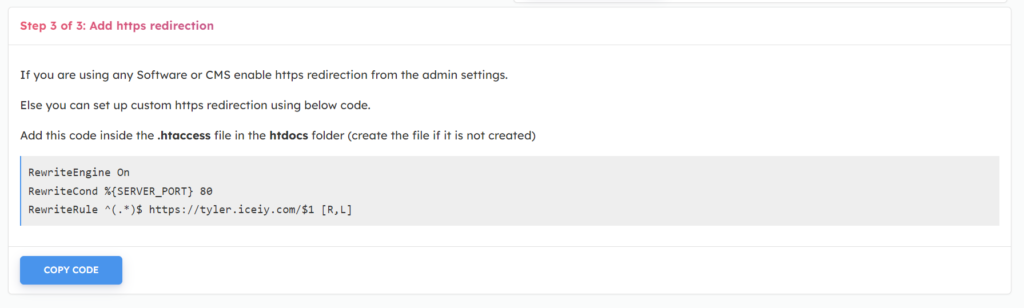
Copy the code, and log in to the file manager. Go inside the “htdocs” folder.
Create a new file called “.htaccess” paste the contents in that file and save the file.
Check if your website redirects to https.
Congratulations ? You have successfully installed the SSL Certificate on your website. We tried making the SSL Installation steps as easy as possible by adding buttons so that you can do everything with some clicks.
If the buttons do not work, you can try doing the manual steps. If you have any issues you can discuss them on our forum and we will be glad to help you!
Bonus: A Video Tutorial
Link to the tutorial: https://youtu.be/MwceLaoQQ-s
Discussion
If you are facing any issues with the guide or want help somewhere, you can discuss it with us or the community on our forum page.