Aeonfree is a free web hosting service, which is designed to help people launch their presence online for free. Getting started and launching your website is easy and can be done within a minute. Quickly get started with our free web hosting service by following the below steps.
Step 1. Register for a free account
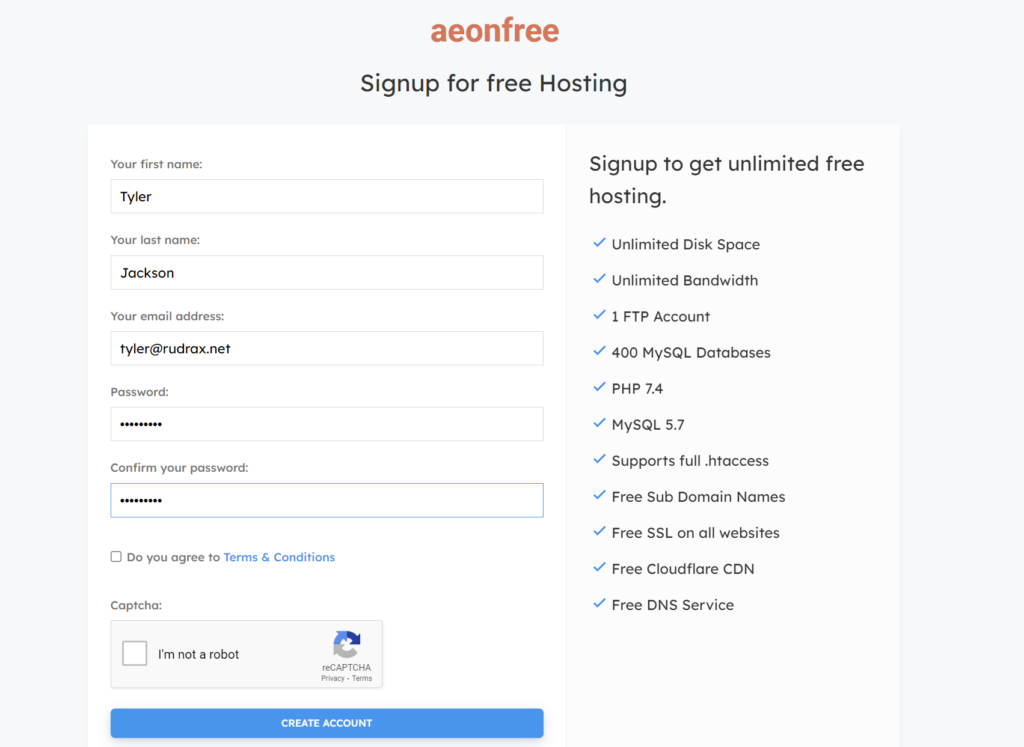
Go to https://web.aeonfree.com/signup and enter your personal details. We require these details to prevent spam and send you helpful notifications regarding your account. Don’t worry we will never send a single spam email.
You will also be required to read our terms and conditions, please read it thoroughly in order to prevent your account from being suspended. As we are a free service we take spam registrations very seriously. If you do not compile with our terms we will be forced to suspend our services.

After clicking on the “Create Account” button, you will need to verify your email address. Please login to your email provider and click on the sent link to verify your email address. If you do not find the mail sent by aeonfree, try looking at the spam folder. If you still cannot find it, you can send it again from our interface.
Step 2. Choose a domain name or a subdomain name.
After you have signed up for an account, you will need to create a new hosting account. Click on the big blue “+ New Account” button or “+ Create New” button (below your hosting accounts).

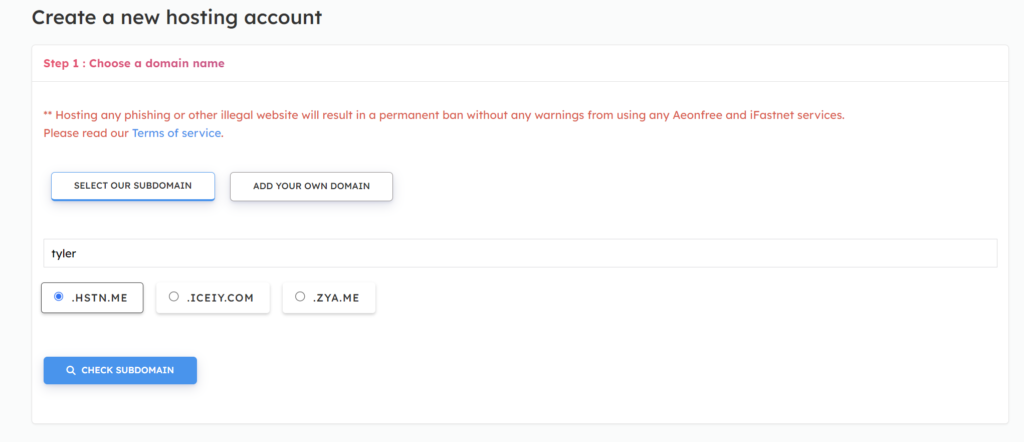
Then you will be redirected to this page.

Select if you would like to use a free subdomain name or if you want to add your own custom domain name you have purchased somewhere.
For Free Subdomain: Select the option “Select our Subdomain” Enter a name e.g.: tyler and select a subdomain name from below e.g.: .hstn.me. Then, Click on check subdomain to check if the subdomain name is available to register.
For Custom Domain Name: Select the option “Add your own Domain“. Go to your domain name registrar and point the nameservers toward:
ns1.hstn.me
ns2.hstn.me
If you are having trouble adding the above nameservers try adding
ns1.byet.org
ns2.byet.org
ns3.byet.org
Then Save the changes. Come back to Aeonfree, and add your domain name here. Then click on the Check Domain Name button to check if you can add your domain name to our service or not.

Errors while adding domain names
While adding the subdomain names or domain names you may encounter these errors. How can you prevent them?
The domain [Your Selected Domain] is not available to register. Please choose another domain name.This error message means that someone else has already added the domain name to our hosting system. You will need to choose any other subdomain name.
What does it mean when you add a custom domain name?
This message occurs when you add your custom domain name. It means that you have already created a hosting account with us. If you have not created an account before, the person who owned the domain name before you might have.
How can you add it again?
You can ask us in the forum or email us regarding the issue and we will help you with it.
Step 3. Register the hosting account

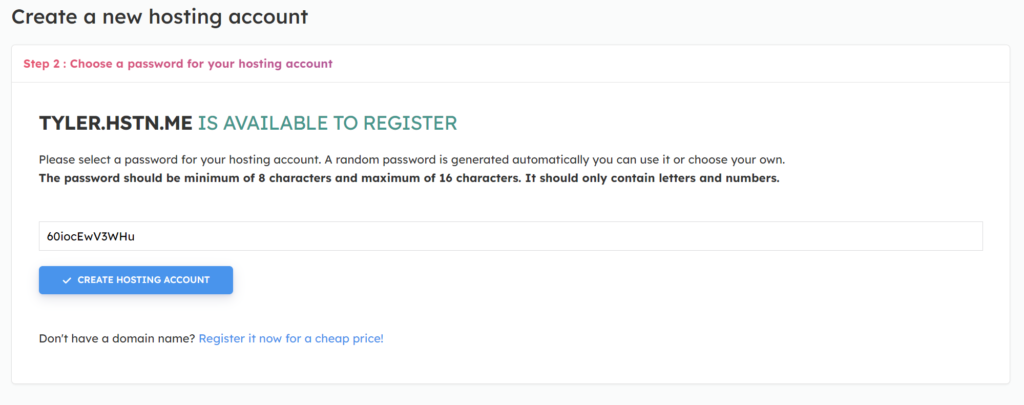
After clicking on “Check domain”, if your domain name is ok to use, we will send you to this interface. You can now choose a new password for your Hosting Account.
This password will be used for MySql Accounts, FTP Accounts, and Control Panel Logins.
You will be emailed this account information, and you can change it again later using the dashboard.
After choosing a password, click on the “Create Hosting Account” button. Your Hosting account will now be in now “Creating” Phase.

You will need to wait 2-5 minutes for the label to show as “Active”, then you can Log in to your FTP accounts or use the Control Panel features. You can then Create SSL certificates for your hosting account.
Step 4. Managing your Hosting Account.
You have created a hosting account, now what? You are seeing this information, what can you do with them?

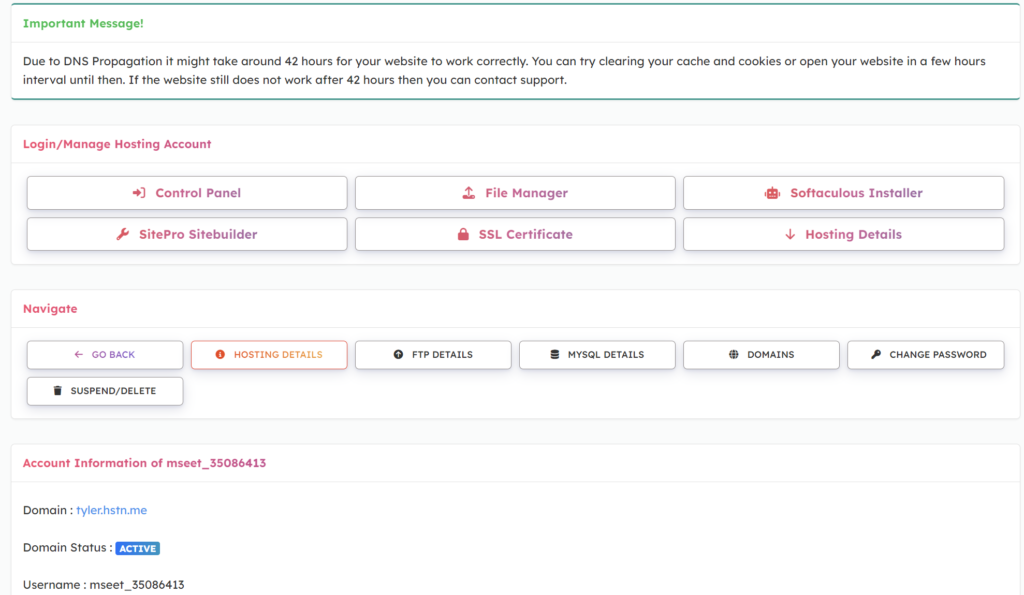
The First Panel, green message tells us that, Due to Caching and DNS propagation your website will be available for everyone to see within 42 hours. If you see an ads page instead of a “Website is Active” page, you will need to wait a few hours for the website to load correctly.
The Second Panel gives us links to the features we can use with this hosting account.
- You can log in to our “Control Panel“, where you can manage your hosting account.
- You can upload your own “PHP or HTML” pages or scripts using the “File Manager” Option.
- You can install any PHP Scripts or Software like WordPress, Drupal, Joomla, Flarum, etc. using the “Softaculous Installer“
- You can create your own free website by using a drag-and-drop website builder with the “SitePro Sitebuilder” option.
- You can install SSL Certificates for free using the “SSL Certificates” option.
The Navigate Panel gives you information on your specific account features.
You can see your Control Panel login information on the Hosting Details tab
You can see your FTP login username, password, and port in the FTP details tab.
You can see your MySql login details, and your MySql databases, and you get the option to add new MySql databases in the MySql Details tab.
You can see your addon domains and subdomains and you get the option to add new domain names and subdomain names in the Domains tab.
You can change your Control panel, FTP, and MySql password from the Change Password tab.
You can suspend or delete your hosting account from the Suspend/Delete tab.
Note: When to Suspend or Delete an account?You can suspend the hosting account when you no longer want to use it anymore and help us free our space. Make sure you have removed your domain names and subdomain names from the hosting control panel before suspending your hosting account. Otherwise, your domain names will be locked for about 30 days.
When can you delete a hosting account?
Deleting a hosting account will not “actually” delete your hosting account, it will be removed from the list on our Dashboard page so that you can free up the space. You can delete an account after it is suspended.
What’s Next?
Congratulations ? You have successfully created a new hosting account with free FTP, MySql, and the ability to choose and add many different domain names and subdomain names. Now what?
The next step includes creating your own website. You can create a new website using the SitePro Sitebuilder by drag and drop tools. Or, you can install a CMS software like “WordPress” from our “Softaculous Installer” option. Believe it or not, WordPress is a really powerful CMS software and will help you create a beautiful website.
Also, make sure to install a Free SSL Certificate to your domain name. Use the Free SSL Generator installer tool in the Dashboard page and Follow the provided Steps.
[Bonus] A video tutorial
Discussion
If you are facing any issues with the guide or want help somewhere, you can discuss it with us or the community on our forum page.
